Tuesday 13 November 2012
A couple of things ... Reduced to one!
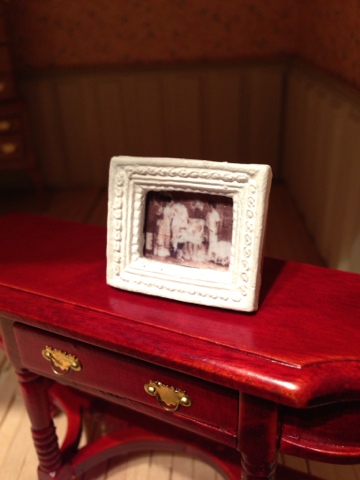
Hope you are all ok tonight. Just a quick post to show you something I made on Sunday. First of all I made a small picture to hang on the wall. I found a nice picture on the Internet and reduced it in photoshop. The frame is one that I found in the card making section of Dunelm Mill's. I painted some gloss Mod Podge on the print before sticking it on cardboard and attaching to the back of the frame. The other thing I made I will show you tomorrow :-)
A couple of small things
Just a quick post tonight! I thought I would show you a little accessory I put together on Sunday. This is a condiment set that I made from a kit purchased from Bindels Ornaments I followed the instructions given on their website, you don't get written instructions with the kit. I have to say it was really easy to do. My only problem is I seem to drop any small part I am working with! It's not fun searching on the floor for very tiny parts! Does anyone have any tips on this?

Sunday 11 November 2012
Something is going wrong....
Please excuse my blog for looking a little strange! This is what happens when a novice blogger decides she wants to pretty things up and doesn't know what she's doing!
If I look at it on my PC it looks fine, if I look on my iPad it isn't going right! My background is coming in halfway down. What can you see?
If I look at it on my PC it looks fine, if I look on my iPad it isn't going right! My background is coming in halfway down. What can you see?
Christmas Swap
I am quite excited to have joined in with my very first Christmas swap, but I am also nervous as well. I've been looking for Christmas minis to make and made a little start today. Follow my link to the right if you want to join in the fun! If anyone has any tips I would love to hear them.
I would also like to thank the people who are now following my little old blog! I really appreciate it and love to hear your comments.
I would also like to thank the people who are now following my little old blog! I really appreciate it and love to hear your comments.
Saturday 10 November 2012
Well it's a wet dull morning in Norwich, I hope the weather is better wherever you are!
This morning I thought I would show you a bed I made for the ladies bedroom. I don't think it strictly adheres to the Edwardian period, but I decided I loved it, and its my house:-) I followed a tutorial from this brilliant website 1inchminisbykris this link takes you directly to the instructions, but take a look at all of her website, she really has some lovely items to make.


Wednesday 7 November 2012
Promised chimneys!
Hi everyone,
I'm on holiday this work from my job, therefore have had more time for doing the dollhouse :) I have everything set up in our outhouse, but it is getting cold! I have a gas fire that I have on, it soon makes it toasty, but I do find that I have to steal myself to get down there. Once I've taken the plunge, I want to spend as much time as I can and begrudge having to do RL work:) It is great though because I can make as much mess as I want, and don't have to clear the things away after I have finished. Perhaps I'll take a photo of it at sometime and you will see what a mess I work in:)
Do you find though, that you feel a bit guilty for doing something for yourself, instead of the housework??
Anyway, when I left off yesterday I said I would show you my chimney's that are ready to be fixed to the top. So here they are -
 Sorry again about the photo, I took it with my phone, and can't be bothered to go and take a decent photo! There I'm honest anyway....
They are made from wooden blocks and I attached the brick slips that I bought from Romney Miniatures. They are really easy to use as they are self spacing and you can also get ones to go round the corners. Glue them on with PVA glue and then make sure you mix some PVA with water and paint it all over the bricks before grouting. This prevents the grout sinking in to the bricks and discolouring. I bought the grout from them as well. I have to say they were very helpful to a novice! I met them at my first outing to the Miniatura fair in Birmingham in March. I had no clue what I needed, how many etc, but as I say, they were extremely helpful. I also bought the clay chimney pots from them.
I didn't really know what to do with the tops of the chimneys so I did a Google search and found a model making forum, sorry, I can't remember which one it was now. Someone had suggested making material for model scenes by mixing baking soda with PVA glue. I just started to pour the soda into the glue and it really reacted very strangely, it sort of curdled! Anyway, I added grey acrylic paint to it and piled it onto the top, as I said it was very strange and I wasn't at all sure what was going to happen, but when it dried it was very hard and stuck solidly to the brick. Sorry, I should have said I glued the chimneys onto the top before putting the strange stuff on! I think it turned out really well though and I would use it again for other things. I think it can also be made white to represent snow.
The little topiary's in the middle of the chimneys are something that I made as well. I had some polystyrene from some packaging which I shaped into the balls. To do this I had a melon ball maker (wont' be used for melons anymore!) and held it over the gas stove to heat up then plunged into the polystyrene. This made semi circles and then I glued them together. Of course you can buy ready made balls but I didn't have any and didn't want to spend money on them. I then threaded them on to kebab sticks, painted with PVA and sprinkled green glade grass that I bought from Games Workshop. Again there were some really helpful chaps in this shop, it is more of a shop for model war game makers, but they were fascinated when I told them what I wanted their products for! It is really nice stuff, nice coloration in it and I have loads left for other things!
I painted the sticks and planted them into the little pots I had bought from Miniatura. I'm afraid I can't recall the name of the people who sold them. To make the soil I used dry tea leaves. I did dry out some that had been used to make a cup of tea, but found they went very orange in colour after brewing! (My son made the mistake of asking what an earth was sitting on the kitchen window sill, as soon as I started to tell him, he laughed and said he wasn't going to ask anymore questions when he saw strange things laying around!)
Right, I think I have waffled on for long enough now, this blogging lark takes time doesn't it!
I'll be back another day to show what I else I have done, I have a lot to catch up on!
Bye for now.
p.s. I forgot to say, I have managed to add links to giveaways on sites that I love to visit, thanks to Plushpussycat's excellent instructions. I have another to add which I will do in a mo!
I'm on holiday this work from my job, therefore have had more time for doing the dollhouse :) I have everything set up in our outhouse, but it is getting cold! I have a gas fire that I have on, it soon makes it toasty, but I do find that I have to steal myself to get down there. Once I've taken the plunge, I want to spend as much time as I can and begrudge having to do RL work:) It is great though because I can make as much mess as I want, and don't have to clear the things away after I have finished. Perhaps I'll take a photo of it at sometime and you will see what a mess I work in:)
Do you find though, that you feel a bit guilty for doing something for yourself, instead of the housework??
Anyway, when I left off yesterday I said I would show you my chimney's that are ready to be fixed to the top. So here they are -

They are made from wooden blocks and I attached the brick slips that I bought from Romney Miniatures. They are really easy to use as they are self spacing and you can also get ones to go round the corners. Glue them on with PVA glue and then make sure you mix some PVA with water and paint it all over the bricks before grouting. This prevents the grout sinking in to the bricks and discolouring. I bought the grout from them as well. I have to say they were very helpful to a novice! I met them at my first outing to the Miniatura fair in Birmingham in March. I had no clue what I needed, how many etc, but as I say, they were extremely helpful. I also bought the clay chimney pots from them.
I didn't really know what to do with the tops of the chimneys so I did a Google search and found a model making forum, sorry, I can't remember which one it was now. Someone had suggested making material for model scenes by mixing baking soda with PVA glue. I just started to pour the soda into the glue and it really reacted very strangely, it sort of curdled! Anyway, I added grey acrylic paint to it and piled it onto the top, as I said it was very strange and I wasn't at all sure what was going to happen, but when it dried it was very hard and stuck solidly to the brick. Sorry, I should have said I glued the chimneys onto the top before putting the strange stuff on! I think it turned out really well though and I would use it again for other things. I think it can also be made white to represent snow.
The little topiary's in the middle of the chimneys are something that I made as well. I had some polystyrene from some packaging which I shaped into the balls. To do this I had a melon ball maker (wont' be used for melons anymore!) and held it over the gas stove to heat up then plunged into the polystyrene. This made semi circles and then I glued them together. Of course you can buy ready made balls but I didn't have any and didn't want to spend money on them. I then threaded them on to kebab sticks, painted with PVA and sprinkled green glade grass that I bought from Games Workshop. Again there were some really helpful chaps in this shop, it is more of a shop for model war game makers, but they were fascinated when I told them what I wanted their products for! It is really nice stuff, nice coloration in it and I have loads left for other things!
I painted the sticks and planted them into the little pots I had bought from Miniatura. I'm afraid I can't recall the name of the people who sold them. To make the soil I used dry tea leaves. I did dry out some that had been used to make a cup of tea, but found they went very orange in colour after brewing! (My son made the mistake of asking what an earth was sitting on the kitchen window sill, as soon as I started to tell him, he laughed and said he wasn't going to ask anymore questions when he saw strange things laying around!)
Right, I think I have waffled on for long enough now, this blogging lark takes time doesn't it!
I'll be back another day to show what I else I have done, I have a lot to catch up on!
Bye for now.
p.s. I forgot to say, I have managed to add links to giveaways on sites that I love to visit, thanks to Plushpussycat's excellent instructions. I have another to add which I will do in a mo!
Tuesday 6 November 2012
Up on the roof!
Where does the time go? I get so into doing the work on the dollhouse and reading everybody else's blogs, then don't do anything to mine!
I have to say though, it is so uplifting to the spirit when you get comments on your blog! I can see that this could get addictive:) It's also made me realise that I should be leaving comments on other people's as well. I have got so used to lurking in the background, thoroughly enjoying reading them, but not leaving a comment to show my appreciation. Can I make a new year's resolution ahead of time? Why not??
Anyway, moving on to my progress on the house. When I got it, there was slate tiling already attached, but I must admit, the more I looked at it, the more I didn't like the finish that had been achieved. Tiles were put underneath other ones and they weren't even. I like realism, but it just looked a bit messy to me. The other problem (in my eyes) was that no lead flashing had been added round the dormer windows or the top. My son advised me that lead flashing is put underneath and on top of tiles to keep the rainwater out! Well, my little people can't get wet can they? Having said that, my house isn't going to have people featuring in it, there will be just the impression that they have gone out! Anyway, I found a picture of how the dollhouse looked, unfortunately not brilliant as I snapped it on my iPhone but I think you can see what I mean:

 So, I began by removing all of the tiles with a heat gun, it was the only way to melt the glue! After prizing them all off, I soaked them in nail varnish remover to get rid of the glue residue. It worked really well, but I must admit I had seen enough of the tiles by the time I had finished! I then set about fixing the lead flashing on and gluing the tiles back in a bit neater. I was pleased with the results, hope you like it too :)
This is with all the lead flashing added, I got it from Minimum World I used the large scallop along the top of the roof and the small one round the dormer window. The lead on the dormer roof was the original used again.
 I have still got to add a little moss around the dormer windows just to make it look more realistic.
I'll move on to the chimneys tomorrow, thanks for reading :)
I have to say though, it is so uplifting to the spirit when you get comments on your blog! I can see that this could get addictive:) It's also made me realise that I should be leaving comments on other people's as well. I have got so used to lurking in the background, thoroughly enjoying reading them, but not leaving a comment to show my appreciation. Can I make a new year's resolution ahead of time? Why not??
Anyway, moving on to my progress on the house. When I got it, there was slate tiling already attached, but I must admit, the more I looked at it, the more I didn't like the finish that had been achieved. Tiles were put underneath other ones and they weren't even. I like realism, but it just looked a bit messy to me. The other problem (in my eyes) was that no lead flashing had been added round the dormer windows or the top. My son advised me that lead flashing is put underneath and on top of tiles to keep the rainwater out! Well, my little people can't get wet can they? Having said that, my house isn't going to have people featuring in it, there will be just the impression that they have gone out! Anyway, I found a picture of how the dollhouse looked, unfortunately not brilliant as I snapped it on my iPhone but I think you can see what I mean:


This is with all the lead flashing added, I got it from Minimum World I used the large scallop along the top of the roof and the small one round the dormer window. The lead on the dormer roof was the original used again.

I'll move on to the chimneys tomorrow, thanks for reading :)
Tuesday 11 September 2012
Finishing the outside of the house - Part 1
Hi to anyone who is reading this, is there anyone out there?? Let me know if there is, as I would love to hear from you.
When I first got my house I decided that I should do all of the outside first. It hadn't been finished on the side walls or the back and I knew I didn't just want to paint it. I looked at the finishes I could do and decided on mixing paint with some fine sand that my son uses in his job as a hard landscaper. I think they use it on block weave drives? Anyway, it was really fine and I thought it would be ok for the finish I wanted. I bought a couple of sample pots of paint from the local hardware shop and just mixed until I thought it looked ok (not very scientific I know!). I painted one coat of this and when it was dry I painted with just paint. As I have moved on with the project I have been thinking of doing some sort of colour wash over it as well, but I haven't tackled it so far. At the moment it is all really neat and tidy, but in real life it would be a bit dirty in places wouldn't it? Here is a picture of it with the windows just sitting in it, I haven't fixed them properly yet. I also painted the quoins in a slightly darker colour to give a little contrast. I made the mistake of painting the top trim (I think it is called dentil?) with gloss paint to start with but it looked awful. When I checked on various forums I realised that it was a complete no no to use gloss, so I re-painted with ordinary household matt paint. It came out much better.

The front door I painted with a Humbrol Gloss paint in colour number 2. It's ok, but I think another time I would use acrylic paint. You'll also see in some photos coming up that it was quite difficult to get a nice finish. Lovely from your normal view but my photos really pick up the flaws! Oh well, this is all a learning curve!
I hand made the letterbox and the door knocker. The letterbox is a piece of cardboard and I used a small piece of lead which was left over from the roof and embossed on it the word 'Letters'. I stuck it on to the cardboard and then trimmed it with a cord taken from a gift card to give like a rope effect. I am fairly pleased with it, could it be better? yes I think it could, but this is my first attempt after all!
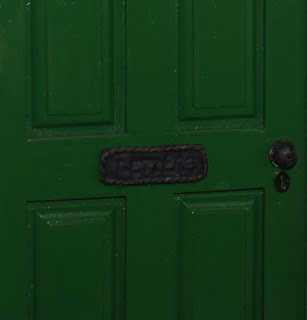
The door knob is a bead that I painted and added to a hole punch size of card. I painted them all with Humbrol Metal Cote paint in black. The door lock is one that I bought from Bindels which is a lovely site and has loads of jewellery findings and beads on. It was originally brass so I painted it with the black as well.
Can you guess what the door knocker is made from?

Yes, of course, its the back off a clip on earring! I wrapped a tiny bit of thin ribbon over the top bit which just finishes it off, again it has been painted in the black, but I can see that a little bit of it has rubbed off, I'll have to retouch it and put some sort of sealer on.
I'll talk some more about the outside in my next post. See you later. Alice
Monday 10 September 2012
Lovely shop...
I was on holiday recently in Florida and eagerly looked for a doll house shop in the area. I found Nancy's online and made sure I found time to visit! It didn't disappoint me! I could have spent hours in there if I hadn't got my husband, son and daughter with me!! I found some lovely blue floral wallpaper in the bargain box ($1 per sheet), a couple of other sheets of wallpaper that I think I might use in one of my hallways.
I was also really pleased to find another sheet of clay bricks made by Houseworks. To explain, I was really lucky about three or four weeks ago, I visited a local car boot sale, and happened across a stall where first of all I spotted some miniature lights. As I looked further I saw wallpaper, wooden staircases, and loads of other things. I was rooting around trying to decide what to buy and my son suggested that I offer to buy it all as a job lot, I asked how much she wanted for everything and she suggested £20.00, I agreed in a shot! I came away with three light fixtures, loads of wood trim, skirting board, a little bit of coving, two sheets of Houseworks clay bricks, slate tiles for floors, wallpapers, plus loads of other stuff!
When I checked the kitchen dimensions I needed one more brick sheet. I looked at the price for me to buy in the UK and was a bit loath to spend the money, so when I saw it at Nancy's I was pleased with the price of $10.99.
Here are not brilliant photos of the things I bought, I took them with my iPhone.
 My favorite item is the hand painted lamp which my husband encouraged me to buy! It is made by Ni Glo and is really lovely. It feels quite heavy and has such lovely hand painting on the shade. I am planning to have one of the rooms as a ladies day room in blue and white, so this and the wallpaper will be lovely together. I am planning to make a writing desk and some sort of comfy settee.

Any way, I am going to go back in time in a short while as I have done quite a few things to the house and have took pictures as I went along. Look out for an update soon. Thanks for reading (if anyone is!)
Alice
I was also really pleased to find another sheet of clay bricks made by Houseworks. To explain, I was really lucky about three or four weeks ago, I visited a local car boot sale, and happened across a stall where first of all I spotted some miniature lights. As I looked further I saw wallpaper, wooden staircases, and loads of other things. I was rooting around trying to decide what to buy and my son suggested that I offer to buy it all as a job lot, I asked how much she wanted for everything and she suggested £20.00, I agreed in a shot! I came away with three light fixtures, loads of wood trim, skirting board, a little bit of coving, two sheets of Houseworks clay bricks, slate tiles for floors, wallpapers, plus loads of other stuff!
When I checked the kitchen dimensions I needed one more brick sheet. I looked at the price for me to buy in the UK and was a bit loath to spend the money, so when I saw it at Nancy's I was pleased with the price of $10.99.
Here are not brilliant photos of the things I bought, I took them with my iPhone.


Any way, I am going to go back in time in a short while as I have done quite a few things to the house and have took pictures as I went along. Look out for an update soon. Thanks for reading (if anyone is!)
Alice
Wednesday 29 August 2012
Giveaway
I love this new blog I've found and she has got a lovely giveaway at the moment. It's a beautiful cabinet! Please visit http://evolve-miniatures.blogspot.com.es
Wednesday 20 June 2012
First Photo

Thursday 17 May 2012
Rubbish start to blogging
I was full of good intentions on how often I was going to blog, but then found that I was more keen on getting started on the Dollhouse!
Tonight I am going to upload my photos so that you can see what I have done so far.
Tonight I am going to upload my photos so that you can see what I have done so far.
Monday 20 February 2012
Early days
I have just bought my first dolls house and I'm well into my 40's!
It is an Edwardian 4 storey house and I hope to blog my progress.
More coming soon...
Subscribe to:
Posts (Atom)