Translate

Tuesday 21 May 2013

Tobacco Adverts

Evening everyone, hope you are all keeping well? I am a member of a UK miniature swap group and they are running this year a 'choose your own theme' swap. Each person who has opted for this swap chooses what the items theme will be, to suit what they are working on. We each have a month and everyone sends an item suitable from our choice. This month it is for a Tobacconist's shop and I made the following metal signs for her.

I got the images (I think, because I can't find them now!) from this blog which is a brilliant source of free images. They have been stuck on metal and then distressed.

I hope she will like them :-)


Thursday 16 May 2013

What's cooking.....

I think I'm on a roll! (No pun intended!) If anyone ever asked me, I have always said I am not a creative person. I am coming to know that perhaps I am, but in a different way. I don't have the imagination to come up with a new idea, but I can see other people's creations and re-create to my ability, slightly changing them to how I want. One of my sisters looked at my work on Saturday and declared that she would not have the patience, and would not be able to do it, so maybe I am! My Nanny would have been pleased, she was an artist and although I can't paint, something must have been passed down :-)

In my last post I told you that I was making egg carton bricks and that I would show you what I was doing.. Well I was making a kitchen range. This is my inspiration photo


I must admit this was so realistic I thought it was real, but I've since discovered that it is miniature :-) the link to it is here.

And this is my interpretation of it:


My range is not as wide to suit the size of my kitchen , and I also decided not to have a fire visible. I started with making a front out of my cardboard stock.


If I did this again I would have made slightly longer bricks to wrap round the edges. This would give a more rounded edge and perhaps look better from the side view. For this one I think I have covered ok with paint.


One of my favourite blogs to read is Brae at Otterine and she has a brilliant tutorial on bricks with egg cartons. Please check out her blog, but I'll warn you, you'll want to read the whole thing, she is so brilliant!

My next task was to cut out the back and sides, I again used the cardboard and glued them with ordinary PVA glue, I didn't take a picture but I added little tabs of cardboard on the inside seams to give it more strength.

I made a mantel piece by layering 3 pieces of cardboard in slightly smaller sizes each layer, to give the effect of moulding. The rail is a kebab stick painted with copper metallic effect acrylic paint.

For the actual stove I used the cardboard again and built up the effect with more cardboard and a small piece of balsa wood for the shelf. The knobs for the handles are from one of those little packets you get in handbags to keep them from getting damp? I have opened a few packets and this particular one had all small balls, but each packet seems to be different! Here's a picture I took before painting with black acrylic paint ( I actually changed the position of the bottom drawer before painting).

The chimney is a piece of wood dowelling that I had from a sponge paint applicator that I bought in Florida last year, I think in Lowes? Who would think that you would buy such things while on holiday :-)

Anyway, I am really quite pleased with the result :-) what do you think?


If you've got this far, then thanks ever so much for reading :-)


Friday 19 April 2013

Progress in coffee shop

Hi everyone, I think I've made a breakthrough! I have managed to spend more time working on the house and thought I would show progress in the coffee shop....

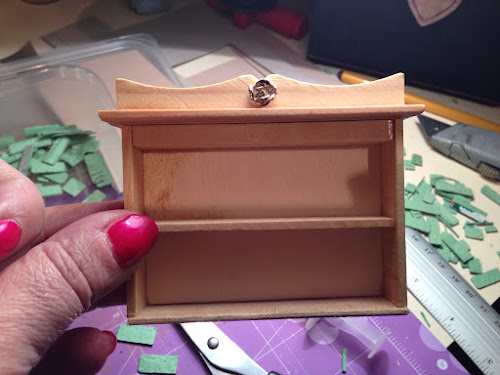
The shelf unit was originally part of a Michaels hutch that I bought when in Florida last year. I painted it and added the small rose which was on a piece of jewellery. I kept it thinking 'I'll use that somewhere' :-) I'm sure every miniaturist knows what I mean! The tea caddies are Reutters porcelain which are really sweet. The two Lily of the valley plates are buttons :-)

Some of my floor tiles are cracked but I decided to keep them. By the time I fill the room with other things I don't think they will be so noticeable...

I've also included a picture of the unit before I painted it. You can also see in the background egg carton bricks ready for the kitchen....

I haven't fitted the coving yet.... The other unit you can see also started off in a yucky glossy pine finish, again I finished it in the nice grey colour. I add glazing medium to the acrylic paint which gives a nice finish.

I put a half staircase in this room to give the illusion of going upstairs.

I have also been working on the kitchen stove range (egg carton bricks as mentioned above), I'll show pictures of it next time..

Thanks for reading and have a nice week :-)


Monday 25 March 2013

I am a frustrated miniaturist....

Real life is getting in my way!! I'm working full time at the moment and the weekends have been taken up with mundane RL stuff! I keep looking at blogs and seeing lovely things made and I'm itching to work on my doll house....

However I have had a problem as well ..

Do you sometimes find yourself just looking at the house and procrastinating? I had a little time the weekend before last, and I did make the bread shown in my previous post, but I did that really because I had dismissed all of the jobs needing to be done to the house. The coving needs to be done but I am hopeless at getting the angles right! Husband came and showed me and it looked clear on what I had to do, as soon as he had gone I tried it myself, disaster struck!

I'm not happy with the lights I fixed in. They are hanging too low from the ceiling! I need to unstick them and pull the wire through.

Some wallpaper still needs to be fixed... My list could go on!

The good news is it is a bank holiday weekend coming up! I am going to work on my house all day Friday and not do a single 'grown up' thing :-)

Finally, I thought I would show my birthday cake made by my lovely youngest daughter. She adores baking and makes a beautiful sponge :-)


Tuesday 19 March 2013

My First attempt at a wood floor

Some time ago I made the floor for one of the bedrooms in the house. I used lolly sticks, cutting them with an eze mitre cutter (I think that is what it's called?) I made a template of the room out of cardboard and then stuck the sticks to the cardboard. That way I could work at my kitchen table and not be tied to the house :-)

Work in progress

Once I had finished the floor I sanded it and then waxed it. I haven't stuck it down yet in the house because I still need to wallpaper the walls. Above is a picture of work in progress. You will see that I had drawn guidelines in pencil, can't say I managed to keep entirely to the lines all the time:-) oh and I used a wood stain on the sticks before I started to cut them.


Finished floor

By the way, on a completely different subject, can I just say thank you to all 27 of my followers! I was surprised but really pleased to see that many :-) You are all welcome, and if anyone has any tips for future floors please let me know!


Sunday 17 March 2013

Anyone for bread?

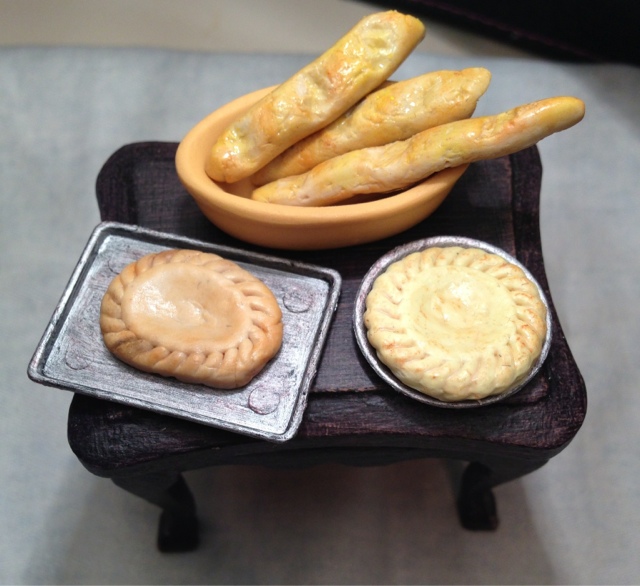
I've had a go this afternoon at making some French baguettes using Fimo clay. Not bad I don't think for my first attempt, but need to work a bit more on the colouring! I also made a couple of pies...

Wednesday 6 March 2013

Best chocolate for a diet...

Just putting another quick post to show you my first attempt at a box of chocolates.  I used fimo clay and made the box using a printie from about.com.  I made this one for a swap, so will do another one for my house :-)